5/29/2014

10 DIY Natural healthy Body Scrub Recipes - Exfoliating Sugar and Salt Scrubs - Make your own & save money

Do It Yourself  Body Scrub Recipes.

back nfr6k
10 DIY Natural healthy Body Scrub Recipes - Exfoliating Sugar and Salt Scrubs - Make your own & save money

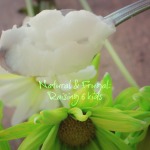
These body scrubs are great used on your whole body & even your face (gently), but I do mostly prefer using them on my lips, feet, ankles, elbows & upper arms.  If you have never used sugar or salt scrubs on your wet skin use in very gentile circular motion, this is about removing dead the skin to achieve skin health not at all about scrubbing hard &  rubbing yourself raw. 

rose 1Sugar scrubs will dissolve as you do the circular motions on wet skin, so use sugar scrub until it dissolves. Not all salts will dissolve while using a scrub so it is best to just scrub in a circular motion on wet skin with salt scrubs for 20 to 30 seconds making sure to not scrub one area too much.

 By gently removing dull dead skin you can let the new layer of skin be breath & healthy, beautiful, glowing skin that looks & feels younger. Exfoliating skin once or twice a week can rejuvenate your skin & aid in healing. 

The gentile exfoliation process rids the skin of any dry, dull skin cells from the surface of the body. By removing the dead cells you aid in helping pores to not become clogged & the result is skin that feels clean, refreshed & rejuvenated. By preventing clogged pores you can prevent larger pores, blackheads, pimples & acne. 
rose 2
When making body scrubs with oils in them  it is best to make them up (mix them) & to let them sit 12 to 24 hours before using them so the oils & the Salt/Sugar set up well together for using, so yes making ahead is great & store in an airtight container.

Fresh fruit scrubs should be made & used right away.Dry scrubs should be used with sugar unless your salt is very fine ground. Dry Herbs & spices are best used in Dry scrubs.

Why pay high prices for body scrubs when they can be made easily for just a few dollars & in most cases work much, much better without toxins. If you are not into making your own body scrubs you are in luck because a great company named Saavy makes a great natural product, check out my review here.

These Body scrubs can be put in cute little mason jars, decorated & given as gifts, everyone seems to love them.

What to use:

You can click any of the highlighted links for more info on the items & why they are so great.

skinSugars to use: Regular white sugar, raw sugar, sugar in the raw, brown sugar, whole unbleached sugar etc, whatever sugar you prefer. I personally use regular white sugar from the grocery store or Organic whole unbleached sugar or both together, mix & match sugars to create the scrub you like best.

Salts to use: Table salt, Sea salt, Natural unrefined salts, Epsom salt, Dead sea salt, Bath salts etc are all fine as long as they are not large chunks, ground is best, mix & match salts to get your desired scrub.

Essential oils to use: Pretty much any essential oil or essential oil combo can be added depending on your personal needs, many prefer to use essential oils for skin like LavenderGeranium, ThievesTea tree oilBlue ChamomileRosemaryLemon or Eucalyptus but many others are great for skin too, mix & match essential oils to get your favorite scent. Where to buy quality essential oils at great prices here, my Top 6 essential oils for DIY here,  And check out my Essential oil giveaway here.

skinOils to use: Jojoba oil, Argan oil, Rosehip seed oil, Real olive oil, Sesame oil, Macadamia nut oil, Emu Oil, Raw coconut oil, Almond oil, Palm oil, Palm Shortening, Wheat Germ oil, any floral infused oils or another natural oil, avoid refined oils, corn oil, sunflower oil, safflower oil, canola oil, baby/mineral oils etc. Mix & match oils to your own personal likes, Coconut oil is solid below 76 degrees so usually need to be mixed with other liquid oils or used above 76 degrees (do not heat oil, use at room temp if you need it liquid), Palm shorting is also thicker & usually needs to be mixed with other liquid oils.

Options to add: Roswater, Jasmine water or other floral infused waters, Colloidal silver, Bentonite clay, natural lotions & creams, Activated charcoal powder (will be very black), Baking soda, Borax, crushed dried flower petals, herbs & spices (such as rose petals, rosemary, lavender etc, best used in dry scrubs)  or whatever else you have read about & prefer to add.

Fresh crushed fruits: Bananas, Mango, peaches, lemon/lemon juice, papaya etc, Adding fruits with sugar is great for skin & scrubs, you do no need to make these & use them & not store them, so it is best to only use regular white sugar or regular brown sugar for these scrubs.

Recipes:

These recipes are just examples & guides you can create your own, so swap out for your favorite oils or essential oils & add in your favorite options.

#1 Scrub - Scrubs with oil: 1/2 cup of sugar of choice (or ground salt of choice), 1/4 to 1/4 cup of oils of choice slowly add 1 tbsp of oils at a time stirring as you add each tbsp, only add enough to get the sugar saturated, mix in desired amount of essential oils (usually 15 to 30 drops total).
coconut oil 3
#2 Scrub - Dry Scrubs: 1 cup of sugar & 1 cup of baking soda, mix with a fork adding your favorite essential oils & herbs if desired. I store these right in an Parmesan cheese shaker.

#3 Scrub - Fruit Scrubs: 1/4 cup of fruit of choice mashed, 1/4 cup sugar of choice, essential oils of choice. Options add in oils of choice as well, just make sure to not make too much. If you do have extra add to sealed container in fridge & try to use soon.

#4 Scrub - Body Butter: Go here to learn how to make my DIY body butters & you can add sugar of choice, salt of choice, essential oils of choice or any optional items to your body butter & use it as a scrub, these are coconut oil body butters so these will be thicker scrubs unless it is warm in your home.

#5 Scrub - My Favorite #1: 3/4 cup of regular white sugar, 1/4 cup of whole unbleached sugar, 1 tbsp colloidal silver, 1 tbsp rosewater, 1/2 cup of room temp raw coconut oil, 1 tbsp Jojoba oil, 1 tbsp Argan oil, 1 tbsp Emu oil, 1 tbsp Rosehip seed oil, 10 drops Lavender essential oil, 10 drops Lemon essential oil & 10 drops Tea tree  oil. Mix by using the same method as my body butter or by hand & store in airtight container.

hand wash baking soda#
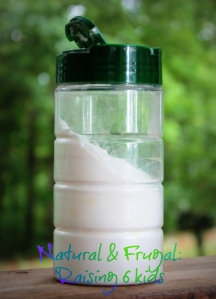
6 Scrub - My favorite #2:  1/4 cup borax. 1/4 cup baking soda 1/4 cup white sugar, 1/4 cup dried crushed rose petals, 10 to 20 drops of  Lavender or Rosemary essential oil, mix dry ingredients with a fork & add essential oil mixing in with the fork & store in a Parmesan cheese shaker similar to my body wash recipe here.

#7 Scrub - My Favorite #3: Add the above #6 Scrub - My favorite #2 to a container slowly add 1/2 cup of room temp raw coconut oil, 1 tbsp Jojoba oil, 1 tbsp Argan oil, 1 tbsp Emu oil, 1 tbsp Rosehip seed oil & store in an airtight container.

#8 Scrub - My Favorite #4: 1/4 cup borax. 1/4 cup baking soda 1/4 cup white sugar, 1/8 cup Activated charcoal powder (yes very black), 1/4 cup Bentonite clay powder, 10 to 20 drops of Tea tree  oil.

#9 Scrub - My Favorite #5: 1/2 cup salt, 1/2 cup baking soda, 10 to 15 drops Eucalyptus essential oil, slowly add 1/2 cup of room temp raw coconut oil, 2 tbsp Rosehip seed oil 2 to 4 tbsp Palm Shortening & mix by using the same method as my body butter or by hand & store in airtight container.

#10 Scrub - My Favorite #6: 1/2 cup of Almond oil, 1/2 cup of wheat germ oil, 1 cup of Epsom salt, 10 to 1o drops lemon essential oil & 10 drops Orange essential oil & store in an airtight container. Options: Use Your favorite oil mixture for skin.

So you see it is very easy to mix & match recipes to create your own, add your favorite essential oils or essential oils you need for skin conditions, if a scrub is not a desired consistency for you add more or less of something.

You can use sugar scrubs on your lips & they are amazing at preventing chapped lips, but in reality using a scrub on your whole body is hydrating & prevents chapping, rashes & skin issues for many.

Tell me your favorite scrub!
_______________________________________________________
Do you have a question? Do you want to contact me? It is easy to contact me with your questions. Go here
_______________________________________________________
The information on this site it intended for general inquiry, research & informational purposes only & should not be considered a substitute or replacement for trained medical advice, diagnosis, or treatment.
I am NOT a doctor, this page is for education & research only, & is NOT intended to be medical advice. Always consult a doctor, your health practitioner or other competent licensed health professional before taking any herbs or supplements, using alternative ideas & for any specific advice about medical treatments. In many cases these statements have not been evaluated by the FDA. This product is not intended to diagnose, treat, or cure any disease.
If you think you, or anyone in your home or who are under your care, are ill or in need medical treatment, please seek the needed medical treatment Any of the information contained in the pages of Natural & Frugal: Raising 6 kids blog, blog posts, site, Facebook page, Twitter, Pinterest or elsewhere are for information & research only.
What Brands of coconut oil do I trust for taking & oil pulling?

That is simple I use & recommend these 2 great brands:
  1. Skinny & Co. Coconut oil: Medicinal grade Extra Virgin coconut oil 100% pure. (click link for ordering info)
  2. Tropical Traditions Virgin Gold Label Coconut oil(click link for ordering info)
Facebook Pages:
You can also follow me on: Pinterest, Google+ & Twitter

- And my daughters blog - Naturally Teen Approved -

Virgin Coconut Oil, Gold Label how to Use Coconut Oil: There are hundreds of uses!
I do accept products to review on my blog
  • My reviews policy: I am sent products to review on my blog and that all opinions are my own. (to contact me to review your product go here)
SmartKlean Laundry ball / Stain remover - Safe - Effective - Saves Money, Water & the Environment. To order a SmartKlean Laundry Ball go here & use my affiliate page.
Thank you for supporting my Facebook pages, Blog & sharing with your friends, Cheree of Natural & Frugal: Raising 6 kids
_______________________________________________________
By Natural & Frugal: Raising 6 kids

5/14/2014

Natural Homemade DIY fruit and vegetable wash and spray - Simple, east, effective

Fresh produce cleaning.

Why should you clean your fresh fruits & vegetables that you buy rather organic or not? Why should you clean the ones from your own garden? Is DIY just as effective as store-bought? 
cropped-back-nfr6k.jpg
Homemade wash your fresh fruits and Vegetables - DIY recipes - Clean and Preserve

fruits & veges
Did you know when you buy fresh produce they can have so many contaminates & toxins on them that they can be a danger if eaten? Well it is true, they for starters have chemicals & pesticides sprayed on them, many times they have an overload of bacteria & pathogens including but not limited to e-coli & salmonella. They also usually have been waxed, picked up contaminates from being handled, packaged, shipped etc not to mention dirt, grime & creepy crawlies.

Most who grow their own fruits & vegetables or buy organic think they are safe & they do not need to clean them, but in reality if you are buying Organics your produce still comes in contact with unclean surfaces, hands toxins, pesticides & who knows what else. Yes in most cases it is worth paying extra for organics but do wash them before putting them away. With a home garden you may or may not have chemical & toxic pesticides on your fruits & vegetables depending on what has been sprayed on your soil before you moved where you live, if you used certain fertilizers & pest control for your garden, if your neighbors used something that got in the air & more so yes washing before storing is again important.

Cleaning your produce actually not only is a protection for you & your family but it also can make your fresh fruits & vegetable lasting longer by staying fresher & healthy, I have had things like strawberries, tomatoes, lettuce, cabbage & even ginger root last 3 times as long just from soaking them in an easy DIY solution for 20 minutes. You will also notice the fruits & vegetable that you have cleaned (soaked) do not spoil as fast & stay fresh like I said but they also are not as prone to molding.
Vinegar jug

Did you know you do not have to pay an arm & a leg for those expensive soaks & sprays they make for produce? Most have things in them anyhow that you are trying to get off your produce.  Most have a very effective ingredient for washing produce right in their kitchen cabinet, cheap, east, effective & most of all safe.
I am going to share several recipes you can decide what works best for you, to learn more about each of these items & why they are amazing for cleaning your produce click the highlighted links. What to use:  vinegar & lemon juice do the best job of getting wax of produce if you know they are waxed pick a recipe with one or both in it, Salt & baking soda are great at removing dirt, grim & bugs, Peroxide & Colloidal silver are both great powerful germ fighters & they are great preservers & mix well with most other ingredients just do not mix these 2 together in the same combo, use one or the other. All the above fight germs, bacteria, are powerhouses at getting grime & dirt & all fight mold so just find what works for you.

 Optional to add Essential oils: like homemade thievesLemon (or other citrus), EucalyptusLavender &/or Tea tree oil can be added to any wash/soak or spray if desired & have great germ fighting power. (check out my top 6 essential oils & why here)

Vinegar: You can use whatever vinegar you prefer such as distilled white vinegar, Apple cider vinegar, citrus vinegar, coconut water vinegar or Bragg Apple Cider Vinegar etc.

To wash leafy greens, lettuce, cabbage, edible leaves etc: Pull apart & separate as much as possible do the soak, add to a colander & allow to dry then store in air tight container.
Vinegar, Baking soda DIY cleaning
Other fruits & vegetables: I just add to the soak making sure to not add to many.
There is no need to rinse off any of these soaks or sprays unless you just want to, if using right away & you added essential oils you may need to rinse but otherwise nothing in the recipes needs washed off & the smell/taste will dissipate & leaving the mixtures on the produce go a long way in continuing to protect what you will be eating.

Fresh fruit & vegetable wash/soak #1: This is the simplest most common method & probably the easiest for most to find all the ingredients fast right in their kitchen. Put the stopper in your clean sink (or use a large bowl) & start filling while water is running add 1/4 to 1/2 cup of vinegar. Let water get just above produce making sure there is enough room to move them around if needed. let sit about 2 or 3 minutes then add a couple tbsp of salt (ordinary cheap table salt is just fine), wait a couple of minutes & give the produce a shake so that any grime, dirt or creepies fall to the bottom, let continue to soak for 15 to 30 minutes. Options: with the salt add several caps of peroxide as the instant reaction of vinegar & peroxide is the most amazing germ killer (read more here).
vinegar
Fresh fruit & vegetable wash/soak #2: Do the same as number 1 but instead use lemon juice & peroxide to replace the vinegar. let soak.

Fresh fruit & vegetable wash/soak #3: This is the soak I use if there is like a lot of fresh produce recalls or a major fresh produce recall going on. To your filling water add 1/4 cup colloidal silver, you can still add the salt (or baking soda) & essential oils you can even just add the colloidal silver to recipe 1 with the vinegar if you prefer. let soak.

Fresh fruit & vegetable wash/soak #4: This is the soak I prefer for vegetables right out of our own garden, add 1/4 cup of baking soda to the water making sure to stir it in. If I feel the need I will add a tbsp or 2 of peroxide or colloidal silver (not both)

sprayFresh fruit & vegetable spray #1: This is the spray I use on the go & carry in my purse for if we stop at a grocery store & get fruit or vegetables to eat on the go, you can carry a spray bottle of vinegar, or colloidal silver, or mix the 2 & simply spray, let sit a minute wipe & eat. But these sprays can be used at home, by adding to a large spray bottle & are very effective. Check out my blog post here: My purse is a total mini natural health pharmacy on my shoulder.

fruits & vegesFresh fruit & vegetable spray #2: This is more of a at home spray that does not replace soaking but can be used as a pre wash until you can soak, or can be used to keep things fresher longer or if you see things starting to turn bad etc. in a large spar bottle combine 1 part lemon juice to 1 part water. Optional: add a pinch of baking soda for every part (lemon/water), use lemon essential oil (1 drop per part), shake & use.

Fresh fruit & vegetable spray #3: In a large spray bottle add 1 tsp baking soda for every cup of water optional: add peroxide
_______________________________________________________

Do you have a question? Do you want to contact me? It is easy to contact me with your questions. Go here

_______________________________________________________
The information on this site it intended for general inquiry, research & informational purposes only & should not be considered a substitute or replacement for trained medical advice, diagnosis, or treatment.
I am NOT a doctor, this page is for education & research only, & is NOT intended to be medical advice. Always consult a doctor, your health practitioner or other competent licensed health professional before taking any herbs or supplements, using alternative ideas & for any specific advice about medical treatments.
If you think you, or anyone in your home or who are under your care, are ill or in need medical treatment, please seek the needed medical treatment Any of the information contained in the pages of Natural & Frugal: Raising 6 kids blog, blog posts, site, Facebook page, Twitter, Pinterest or elsewhere are for information & research only.
What Brands of coconut oil do I trust for taking & oil pulling?

That is simple I use & recommend these 2 great brands:
  1. Skinny & Co. Coconut oil: Medicinal grade Extra Virgin coconut oil 100% pure. (click link for ordering info)
  2. Tropical Traditions Virgin Gold Label Coconut oil(click link for ordering info)
Facebook Pages:
You can also follow me on: Pinterest, Google+ & Twitter

- And my daughters blog - Naturally Teen Approved -

Virgin Coconut Oil, Gold Label how to Use Coconut Oil: There are hundreds of uses!
I do accept products to review on my blog
  • My reviews policy: I am sent products to review on my blog and that all opinions are my own. (to contact me to review your product go here)
SmartKlean Laundry ball / Stain remover - Safe - Effective - Saves Money, Water & the Environment. To order a SmartKlean Laundry Ball go here & use my affiliate page.
Thank you for supporting my Facebook pages, Blog & sharing with your friends, Cheree of Natural & Frugal: Raising 6 kids
_______________________________________________________
By Natural & Frugal: Raising 6 kids

5/10/2014

How to make sourdough bread recipe – Part 2 – Healthy baking

Sourdough bread

sourdough bread header

Part 2 of making sourdough bread

sourdough nfr6kWell here it is the much asked for & waited for blog post on exactly how I make my sourdough bread my family loves. If you do not have a sourdough starter you do need one, so go check out my blog post here & find out where to get your own starter or how to make your own starter.
sourdough bread loaf 1
Sourdough bread making like all bread making has a learning curve for most, at first it might not go as planned, not look good, not taste good or something in between, but do not give up it does get better & it is worth it. So if it comes out dense & hard your first batch make a few adjustments & try again next week. One of the awesome things about sourdough is you can literally find thousands of recipes online for using your dough & you can tweak them, combine ideas & come up with the bread you dreamed of making. Have fun & enjoy your daily bread :)

sourdough 2I was going to write all the great reasons why sourdough is an amazing bread & why it is so beneficial & healthy & yes even why it should be the only bread eaten in your house, but I did a search & discovered a great post that explains it so well I am just going to link you to it to read later: 5 Reasons To Make Sourdough Your Only Bread.

If you were given a sourdough starter by a friend usually they give you  basic directions & recipes along with that awesome gift of the starter. But I have found most of those recipes just leave a lot to be desired or they are hard to understand & so many times your result is nothing like you imagined or hoped for. Yes I have been down the making sourdough bread from a basic recipe more than once, I am not sure why I tried it more than once other than maybe the baker in me is convinced I can defeat that recipe & turn out an awesome bread just because I did it with love as an ingredient, nope that did not work either. Don't get me wrong basic sourdough recipes are not all that horrible  for some, but these recipes turn many off to making their own fresh-baked bread & it really does not have to be that hard.
sliced sourdough nfr6k
Yes sourdough takes time as in waiting, but the actual prep time is minimal, the less you mess with it actually can make it better. Oh & yes please bring the love, even though love does not save a basic recipe it is a required ingredient for home baking, so anytime you are cooking or baking bring the love <3

Let the kids help you in the sourdough process, my kids love to assist & I think it makes the bread taste even better to them, we use it in homeschool for home ec & teaching about measuring (math) & about fermenting (science), following directions (reading & comprehending). It is great to get your kids in the kitchen cooking & baking with you, mine look forward to it.

sourdough bread 1OK so your sourdough starter has sat about 24 hours after being fed & you are ready to remove 1 cup of starter & start making bread. Yea it is time to get your one cup of starter but slow down a bit, sourdough is in no way a rushed bread. Rather sourdough is a prep wait, prep some more & wait more, some more prep & more waiting, so it is not a hey let's get kneading & baking & have bread ready in just a few kinda bread, nope it is slow like a sloth & it is ready when it says it is ready.

Tips:

sourdough 4Flour: Use any flour or bread flour of choice for different flavors & textures, I do try to stick to healthier flours like Einkorn flour, Coconut flour, Brown rice flour, sprouted whole wheat flourstone ground whole wheat bread flour, other stone ground flours & whole grains I grind myself (review here), (all non GMO), but sometimes I do run out before my order of flour arrives so I have used Bread flour & all-purpose flour from the grocery store. (I also love mixing flour & prefer Einkorn flour, bread flour & coconut flour together for making the actual bread) I have discovered that using at least a third of the flour portion as bread flour does create a softer less dense bread, yes that means buying bleached bread flour & using it at least for me since I live out in the boonies, but I do make at least some of my bread either half or a third bread flour. If using coconut flour it is best to mix it & stay to less than a cup of it, I use like 1/4 to 1/2 cup of coconut flour because it can create a very dense bread. So get creative & find the balance of flours that suits you.

sourdough 7Water: Water is important, yea I have read blog posts that say it makes no difference but filtered water does make a more viable starter & in making the bread also, well water is usually ok & so is fresh spring water. Avoid jugs of drinking water, city water & county water (tap water)

Utensils/bowl & cover/spoon etc: I do avoid metal bowls & use a plastic mixing bowl, because it is fermenting while in the bowl, but I would prefer a glass, ceramic or wooden bowl & hope to get one soon. I prefer a bowl with a seal tight lid & since the lid is missing to my glass bowl I am currently using a plastic bowl with a seal tight lid, but it works. If you do not have a seal tight lid for your bowl plastic wrap will work, just wrap the whole bowl to create a tight closure. And spoon, whisk, pan etc can be used for stirring, mixing, cooking etc.

Oil: I prefer healthy oils & mostly prefer raw coconut oil. but you can use another healthy oil like olive oil, palm shortening or your favorite. It does need to be liquid or at least soft so use room temp oil, do not heat it.
sourdough 10

Are you ready?

Making the sourdough sponge step 1:

sourdough 1First shake or stir your starter in the jar or container you store it in. then measure out one cup of stater (I sometimes depending on mood might do just a bit over a cup of starter). Add the starter to your mixing bowl. add 1 cup of the warm water, not hot just nice & warm, & the 2 tsp salt stir or whisk the starter, salt & the warm water together slowly adding 3 cups of flour of choice (I usually do 1 & 1/2 cups bread flour & 1 & 1/2 cups einkorn flour here). I add the flour 1/2 cup at a time mixing in well before adding the next 1/2 cup & adding the rest of the water as I go to mix with the flour. When I am done I have added 3 cups of flour & 1 & 1/2 cups water & it is mixed well. Now cover tightly & let sit at room temp for 4 hours or overnight.

Tip: I do this sponge step either before bed & let sit all night, or I do it first thing in the morning & let sit until a couple of hours before cooking, I prefer it to sit at least 8 hours but some prefer 2 hours, 4 hours, 12 hours, see what you like best. In the warmer months you might want to stay closer to 4 hours, in cooler months or if cool in your house maybe 8 to 12 hours. After a couple of hours you should notice your sponge forming with air holes & kinda puffing up & smoothing out in places, this shows your sponge is working.

Mixing the sourdough sponge into dough step 2:

sourdough (2)After you have let your sponge ferment for however long you desire now it is time to make the dough. Flour a surface where you will be kneading your dough so it wont stick, use only enough flour to prevent sticking to surface & your hands. dump your sponge onto floured surface, now it is time to bring the love. in a small dry bowl whisk all lumps out of 2 cups of flour & 1 tsp of salt (hold back the other cup of flour you may or may not need it). I knead my dough on my bamboo cutting board, it works perfectly.

Form a well or pit in the center of your sponge add one cup of your flour & salt mix then slowly work that into the dough kneading it till covered, then repeat by creating another pit & adding the rest of the flour, keep kneading from the bottom only until flour is mixed in. Add another cup of flour only if dough is very sticky. Kneading for me is kinda like folding towels, I pull one side over, then the other & the other (4 sides) & repeat from the bottom only & this pulling action will make a smooth top.

Let your dough sit there a few minutes while you wash & dry your mixing bowl, now take your oil & liberally apply to inside of bowl. I like to just add some oil to the bottom of the bowl & rub on inside of bowl with my hands. Now pick up your dough & sit in the bowl smooth side down wait about 30 seconds for it to get oil on it & turn it over, now cover bowl & let sit 2 hours.
sourdough 6
Tip: Again you can let this stage go 2 hours, 4 hours, 8 hours, overnight, 12 hours whatever works for you. I tend to feed my starter one day, wait 24 hours, make my sponge wait up to 24 hours, knead my dough & wait up to 24 hours. You can do it sooner or let it sit until you are ready (within reason).

Options: you can add 1/2 cup of sugar & 2 tbsp of cinnamon into the flour salt mixture if you want cinnamon bread. You can use white sugar, cane sugar, refined sugar, raw sugar, sugar in the raw, I use Organic whole unbleached sugar from Tropical Traditions here.

Making your dough into loaves of bread step 3:

sourdough 3
Flour your surface & dump your dough out onto it, again bring the love & it is time to feel like a kid again playing with play dough. Cut your dough in half with a sharp knife & sit half aside.

As you can see by my pictures when I make loaves of bread I do not use a bread pan, you can if you want & I do sometimes. I do prefer to just put on a pan & bake. And as you see I make either round rolls or long rolls, but you can get creative, I many times make a bunch of dinner size rolls & have even made other things like biscuits or cinnamon rolls as well.

sourdough 8Ok start kneading your dough the same way as last time but only do it enough to have a smooth top, so less is more with kneading but you do need to knead :) then sit the dough on your greased baking sheet (as you can see by some of my pictures I have a new baking mat (review coming very soon) & it does work great for my bread & no need to grease the mat).  Knead the other half of the bread & sit it on the pan, cover pan well with plastic wrap (I know I hate plastic wrap to but sometimes well it just works best).

Tip: I like to get the pan warmed to about 200 before adding the dough, let cool about 10 minutes before wrapping with plastic wrap. This is just a trick I was taught long ago that I use anytime I am baking bread, biscuits etc.

sourdough 5Let sit 2 to 4 hours then preheat oven to 450 & remove plastic wrap from pan & cut 3 or 4 slices gently into the top of the dough, any design is fine. Depending on your oven either leave the temp at 450 or turn to 425 or 400, sit the pan on the middle rack & cook 10 minutes & check bread, it usually takes 20 to 25 minutes but check to make sure you are not burning it, you want it browned not burned. If you added it to a bread pan it might take longer & may need to be cooked at a lower temp. When it is done cooking let cool down before eating, yes it does taste great still warm, but as we discovered it taste far better cool, but whatever way you prefer it do that :)

sourdough 9Bread Machine:

When I was discussing on my Facebook page with my fans about doing this blog post on making sourdough bread some wanted me to include how to make it in a bread machine. I have done A LOT of research & the only real way to do that is if you have a bread machine that you can put the dough in it after doing the first parts of step 3 above & let it sit 2 hours (I have never used a bread machine so I hope you understand this). So you still need to do all the work in the steps you just cook it in the machine & by what I can tell by reading it is a lot harder than just baking it my way. But for those who still would like to try I basically recommend doing a lot of research for your type of machine.
sourdough bread header

There you go, you made your family fresh bread & you brought the love.


_______________________________________________________

Do you have a question? Do you want to contact me? It is easy to contact me with your questions. Go here

_______________________________________________________
The information on this site it intended for general inquiry, research & informational purposes only & should not be considered a substitute or replacement for trained medical advice, diagnosis, or treatment.
I am NOT a doctor, this page is for education & research only, & is NOT intended to be medical advice. Always consult a doctor, your health practitioner or other competent licensed health professional before taking any herbs or supplements, using alternative ideas & for any specific advice about medical treatments.
If you think you, or anyone in your home or who are under your care, are ill or in need medical treatment, please seek the needed medical treatment Any of the information contained in the pages of Natural & Frugal: Raising 6 kids blog, blog posts, site, Facebook page, Twitter, Pinterest or elsewhere are for information & research only.
What Brands of coconut oil do I trust for taking & oil pulling?

That is simple I use & recommend these 2 great brands:
  1. Skinny & Co. Coconut oil: Medicinal grade Extra Virgin coconut oil 100% pure. (click link for ordering info)
  2. Tropical Traditions Virgin Gold Label Coconut oil(click link for ordering info)
Facebook Pages:
You can also follow me on: Pinterest, Google+ & Twitter

- And my daughters blog - Naturally Teen Approved -

Virgin Coconut Oil, Gold Label how to Use Coconut Oil: There are hundreds of uses!
I do accept products to review on my blog
  • My reviews policy: I am sent products to review on my blog and that all opinions are my own. (to contact me to review your product go here)
SmartKlean Laundry ball / Stain remover - Safe - Effective - Saves Money, Water & the Environment. To order a SmartKlean Laundry Ball go here & use my affiliate page.
Thank you for supporting my Facebook pages, Blog & sharing with your friends, Cheree of Natural & Frugal: Raising 6 kids
_______________________________________________________
By Natural & Frugal: Raising 6 kids

5/09/2014

How to make a sourdough starter - Part 1 - Making healthy sourdough bread

Sourdough Starter

Part 1 of making sourdough bread

sourdough starter header


After so many asked me to share how I make my healthier sourdough bread in an upcoming blog post I figured before I post that one I should post how to make your own starter for those who do not have one, that way you will already have your starter when the time comes to make bread.

Yes I do think the best way to get a sourdough starter is for a friend or family member to give you an already established starter. I think starters the older they get the better they work, so having a friend give you starter that is from the batch they have kept going a year, 5 years, 10 years or longer would be amazing

But not everyone knows someone to give them a starter & another option to get an established sourdough starter is to buy one on ebay, yeap thats right you can get good quality starters there, check it out here.

Another option is to make your own sourdough starter & there are varying ways to do that, I will share a few here, some I have tried some I have heard work great.

Remember your newly created starter is new so your first batch of bread wont taste as good until your starter establishes itself, so every batch will get better.

sourdough starter 2Not everyone will have success making a starter, pick the one you think will work best for you, & just because it works for someone else & not for you do not give up. Sometimes it can take more than 1 try to get it right. Most have the best success with the potato flake starter & the kombucha starter, I have made both in the past but currently have  a gifted 10 year old potato flake starter that is amazing.

Tips:

Sugar: You can use white sugar, cane sugar, refined sugar, raw sugar, sugar in the raw, I use Organic whole unbleached sugar from Tropical Traditions here.

Flour: Use any flour or bread flour of choice for different flavors & textures, I do try to stick to healthier flours like Einkorn flour, Coconut flour, Brown rice flour, sprouted whole wheat flourstone ground whole wheat bread flour, other stone ground flours & whole grains I grind myself (review here), (all non GMO), but sometimes I do run out before my order of flour arrives so I have used Bread flour from the grocery store. (I also love mixing flour & prefer Einkorn flour, bread flour & coconut flour together for making the actual bread)

Water: Water is important, yea I have read blog posts that say it makes no difference but filtered water does make a more viable starter, well water is also usually ok & fresh spring water. Avoid jugs of drinking water, city water & county water (tap water)

Utensils/bowls/spoon etc: Using wooden or plastic spoon to stir is best, but if you only have metal it is still ok. I do avoid metal bowls & use a plastic mixing bowl, only because it is fermenting while in the bowl, but I would prefer a glass, ceramic or wooden bowl & hope to get one soon.

Cover: Most can be done right in a quart jar & add the lid loosely, you can use a cheese cloth & sit the lid over the cheese cloth.

Potato flake sourdough starter:

To a quart jar with a lid add 1 cup warm water, ½ cup sugar,2 & 1/2 tsp dry yeast, 3 TBSP potato flakes, mix well & replace the lid, let sit on the counter or in the cupboard at room temp for about 2 days (watch the jar you might need to loosen the lid a bit. After the 2 days then you need to feed your starter.  Sit in the jar fridge for 3 days & on the 4th day you are ready to feed the starter & then to make bread.

Feeding: To the quart jar add 1 cup of warm pure water, 1/2 cup sugar & 3 tbsp of potato flakes, mix &  replace the lid & leave starter sitting at room temp, again watch just in case you need to loosen the lid. Let sit at room temp 24 hours & then you will be removing your 1 cup of starter for your bread. Put the remainder of your starter in the fridge.

Repeat the feeding process every 5 to 7 days

Kombucha sourdough starter:

This starter is amazing for using leftover kombucha tea & to have a lacto fermented (culture/probiotic) sourdough starter.

To a quart jar add 1/2 cup of kombucha tea that was fermented at least 15 to 30 days, & add 1/2 cup of flour, stir  & either put the lid on loose or cover with a cloth.

Let sit at room temp for 24 hours & it is ready for you to feed it.

sourdough bread 1Feeding: add 1/2 cup kumbucha tea, 1/2 cup flour of choice & 1/2 cup of pure water, sit jar on a plate & cover loosely or with a cloth, watch starter for rising & overflowing, if it starts to explode or overflow just give it a little stir. Let it sit 24 hours then you are ready to remove a cup for your sourdough bread & place the rest of the starter in the fridge.

You can repeat the feeding process every other day if desired or do once a week, some even do it daily.


Basic Sourdough starter:

To a quart jar add 4 tbsp of flour of choice (in researching most recommend whole wheat), 1/4 cup pineapple juice, mix, loosely screw the lid on the jar & set on the counter  or in a cupboard at room temp for 24 hours, stir several times & make sure jar does not overflow (sit a plate under jar if needed). After 24 hours add 2 tbsp of flour of choice & 2 tbsp of pineapple juice, again add the lid loosely  let sit 2 days stirring twice a day. After 2 days as long as your starter smells fermented & not rotten continue the process by mixing 5 tbsp of flour of choice & 3 tbsp of pure water or distilled water, again put the lid on loosely & sit for 24 hours stirring only if needed.

Feeding: After 24 hours add 1/2 cup flour of choice & 1/2 cup pure water Let sit at room temp 24 hours covered loosely & your starter is ready.  You will be removing your 1 cup of starter for your bread, put the remainder of your starter in a cupboard with lid on tight & stir once daily (some keep starter in sealed gallon ziplock bag & just squeeze the bag daily & release gas as needed).

Repeat the feeding process, let sit 24 hours & remove 1 cup of starter every 5 to 7 days

Potato water sourdough starter:

sourdough starterPeel 2 large potatoes, add to a pot with just enough water to cover potatoes & cover pot, allow to cook until soft (do not let water boil out add more if needed). Leaving potatoes on med/low mash the potatoes with a fork in the water & let sit several minutes. allow to cool (still warm) add cup of potato water to quart jar, add 4 tbsp of flour, 2 tbsp of sugar, 1 tsp of natural unrefined salt, stir, put lid on jar loosely covered, sit jar on a plat & sit on counter or cupboard at room temp until it gets bubbly & smells fermented (not rotten) usually 4 to 7 days, watch to see if you need to stir, only stir starter when making if there is danger of it overflowing. You are now ready to feed the starter & remove one cup after.

Feeding: Mix 1 cup flour, 1 cup warm water into jar & let sit out at room temp 24 hours, then remove 1 cup of starter for your bread, put the lid on the jar tight & put the remainder in the fridge,.

Repeat the feeding process once a week.

Potato sourdough starter:

In a quart jar add 2 cups grated raw potato, 1 cup warm water, 1 & 1/2 cups flour, 1 tsp of natural unrefined salt, 1 tsp sugar, mix well, cover loosely with lid & let sit 24 hours at room temp. After 24 hours stir & cover tightly, stir several times a day, leave sitting at room temp 2 to 4 day sit is done when foamy, stir put lid on tight & sit in refrigerator. After a day or 2 several inches of clear liquid will form on the top of the jar it is ready for feeding.remove 1 cup to make your bread.

Feeding: This one makes a double batch (2 cups starter). (you may need to add to mixing bowl for 24 hours or use larger jar). Add 1 & 1/2 cup flour & 1 & 1/2 cup warm water 1 tsp sugar, stir cover with a lid loosely or plastic wrap, let sit 24 hours & remove 2 cups, put remainder of starter in a jar with tight lid in fridge.

Repeat the feeding process once or twice a week.

sourdough starter header

Take care of your starter:

Now that you have taken the time to create a starter take care of it & let it mature & age properly, it might take a month or 2 but the more time you give it the better the bread you make from your starter will taste.

Next up lets make sourdough bread, stay tuned.............

sourdough 2
_______________________________________________________

Do you have a question? Do you want to contact me? It is easy to contact me with your questions. Go here

_______________________________________________________
The information on this site it intended for general inquiry, research & informational purposes only & should not be considered a substitute or replacement for trained medical advice, diagnosis, or treatment.
I am NOT a doctor, this page is for education & research only, & is NOT intended to be medical advice. Always consult a doctor, your health practitioner or other competent licensed health professional before taking any herbs or supplements, using alternative ideas & for any specific advice about medical treatments.
If you think you, or anyone in your home or who are under your care, are ill or in need medical treatment, please seek the needed medical treatment Any of the information contained in the pages of Natural & Frugal: Raising 6 kids blog, blog posts, site, Facebook page, Twitter, Pinterest or elsewhere are for information & research only.
What Brands of coconut oil do I trust for taking & oil pulling?

That is simple I use & recommend these 2 great brands:
  1. Skinny & Co. Coconut oil: Medicinal grade Extra Virgin coconut oil 100% pure. (click link for ordering info)
  2. Tropical Traditions Virgin Gold Label Coconut oil(click link for ordering info)
Facebook Pages:
You can also follow me on: Pinterest, Google+ & Twitter

- And my daughters blog - Naturally Teen Approved -

Virgin Coconut Oil, Gold Label how to Use Coconut Oil: There are hundreds of uses!
I do accept products to review on my blog
  • My reviews policy: I am sent products to review on my blog and that all opinions are my own. (to contact me to review your product go here)
SmartKlean Laundry ball / Stain remover - Safe - Effective - Saves Money, Water & the Environment. To order a SmartKlean Laundry Ball go here & use my affiliate page.
Thank you for supporting my Facebook pages, Blog & sharing with your friends, Cheree of Natural & Frugal: Raising 6 kids
_______________________________________________________
By Natural & Frugal: Raising 6 kids