Sourdough bread

Part 2 of making sourdough bread
 Well here it is the much asked for & waited for blog post on exactly how I make my sourdough bread my family loves. If you do not have a sourdough starter you do need one, so go check out my blog post here & find out where to get your own starter or how to make your own starter.
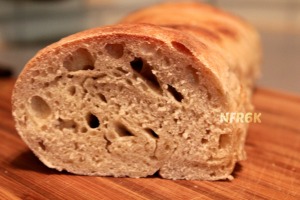
Sourdough bread making like all bread making has a learning curve for most, at first it might not go as planned, not look good, not taste good or something in between, but do not give up it does get better & it is worth it. So if it comes out dense & hard your first batch make a few adjustments & try again next week. One of the awesome things about sourdough is you can literally find thousands of recipes online for using your dough & you can tweak them, combine ideas & come up with the bread you dreamed of making. Have fun & enjoy your daily bread :)
 I was going to write all the great reasons why sourdough is an amazing bread & why it is so beneficial & healthy & yes even why it should be the only bread eaten in your house, but I did a search & discovered a great post that explains it so well I am just going to link you to it to read later: 5 Reasons To Make Sourdough Your Only Bread.
If you were given a sourdough starter by a friend usually they give you basic directions & recipes along with that awesome gift of the starter. But I have found most of those recipes just leave a lot to be desired or they are hard to understand & so many times your result is nothing like you imagined or hoped for. Yes I have been down the making sourdough bread from a basic recipe more than once, I am not sure why I tried it more than once other than maybe the baker in me is convinced I can defeat that recipe & turn out an awesome bread just because I did it with love as an ingredient, nope that did not work either. Don't get me wrong basic sourdough recipes are not all that horrible for some, but these recipes turn many off to making their own fresh-baked bread & it really does not have to be that hard.
Yes sourdough takes time as in waiting, but the actual prep time is minimal, the less you mess with it actually can make it better. Oh & yes please bring the love, even though love does not save a basic recipe it is a required ingredient for home baking, so anytime you are cooking or baking bring the love <3
Let the kids help you in the sourdough process, my kids love to assist & I think it makes the bread taste even better to them, we use it in homeschool for home ec & teaching about measuring (math) & about fermenting (science), following directions (reading & comprehending). It is great to get your kids in the kitchen cooking & baking with you, mine look forward to it.
 OK so your sourdough starter has sat about 24 hours after being fed & you are ready to remove 1 cup of starter & start making bread. Yea it is time to get your one cup of starter but slow down a bit, sourdough is in no way a rushed bread. Rather sourdough is a prep wait, prep some more & wait more, some more prep & more waiting, so it is not a hey let's get kneading & baking & have bread ready in just a few kinda bread, nope it is slow like a sloth & it is ready when it says it is ready.
Tips:
 Flour: Use any flour or bread flour of choice for different flavors & textures, I do try to stick to healthier flours like Einkorn flour, Coconut flour, Brown rice flour, sprouted whole wheat flour, stone ground whole wheat bread flour, other stone ground flours & whole grains I grind myself (review here), (all non GMO), but sometimes I do run out before my order of flour arrives so I have used Bread flour & all-purpose flour from the grocery store. (I also love mixing flour & prefer Einkorn flour, bread flour & coconut flour together for making the actual bread) I have discovered that using at least a third of the flour portion as bread flour does create a softer less dense bread, yes that means buying bleached bread flour & using it at least for me since I live out in the boonies, but I do make at least some of my bread either half or a third bread flour. If using coconut flour it is best to mix it & stay to less than a cup of it, I use like 1/4 to 1/2 cup of coconut flour because it can create a very dense bread. So get creative & find the balance of flours that suits you.
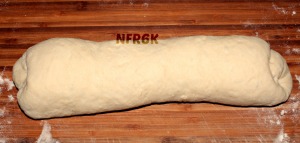 Water: Water is important, yea I have read blog posts that say it makes no difference but filtered water does make a more viable starter & in making the bread also, well water is usually ok & so is fresh spring water. Avoid jugs of drinking water, city water & county water (tap water)
Utensils/bowl & cover/spoon etc: I do avoid metal bowls & use a plastic mixing bowl, because it is fermenting while in the bowl, but I would prefer a glass, ceramic or wooden bowl & hope to get one soon. I prefer a bowl with a seal tight lid & since the lid is missing to my glass bowl I am currently using a plastic bowl with a seal tight lid, but it works. If you do not have a seal tight lid for your bowl plastic wrap will work, just wrap the whole bowl to create a tight closure. And spoon, whisk, pan etc can be used for stirring, mixing, cooking etc.
Oil: I prefer healthy oils & mostly prefer raw coconut oil. but you can use another healthy oil like olive oil, palm shortening or your favorite. It does need to be liquid or at least soft so use room temp oil, do not heat it.
Sourdough: A Healthy Bread That is Good For You!
Are you ready?
Making the sourdough sponge step 1:
- 1 cup starter
- 1 & 1/2 cup warm water
- 2 tsp natural unrefined salt
- 3 cups flour
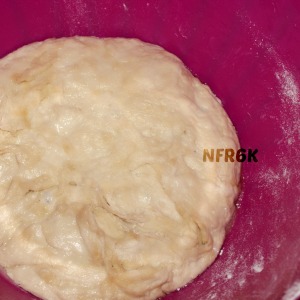 First shake or stir your starter in the jar or container you store it in. then measure out one cup of stater (I sometimes depending on mood might do just a bit over a cup of starter). Add the starter to your mixing bowl. add 1 cup of the warm water, not hot just nice & warm, & the 2 tsp salt stir or whisk the starter, salt & the warm water together slowly adding 3 cups of flour of choice (I usually do 1 & 1/2 cups bread flour & 1 & 1/2 cups einkorn flour here). I add the flour 1/2 cup at a time mixing in well before adding the next 1/2 cup & adding the rest of the water as I go to mix with the flour. When I am done I have added 3 cups of flour & 1 & 1/2 cups water & it is mixed well. Now cover tightly & let sit at room temp for 4 hours or overnight.
Tip: I do this sponge step either before bed & let sit all night, or I do it first thing in the morning & let sit until a couple of hours before cooking, I prefer it to sit at least 8 hours but some prefer 2 hours, 4 hours, 12 hours, see what you like best. In the warmer months you might want to stay closer to 4 hours, in cooler months or if cool in your house maybe 8 to 12 hours. After a couple of hours you should notice your sponge forming with air holes & kinda puffing up & smoothing out in places, this shows your sponge is working.
Mixing the sourdough sponge into dough step 2:
- 2 cups flour
- 1 cup flour
- 1 tsp natural unrefined salt
- flour for surface & hands
- oil for mixing bowl
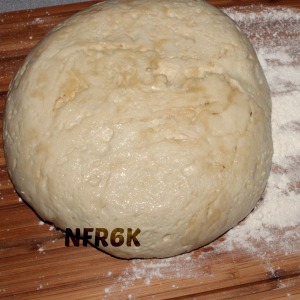 After you have let your sponge ferment for however long you desire now it is time to make the dough. Flour a surface where you will be kneading your dough so it wont stick, use only enough flour to prevent sticking to surface & your hands. dump your sponge onto floured surface, now it is time to bring the love. in a small dry bowl whisk all lumps out of 2 cups of flour & 1 tsp of salt (hold back the other cup of flour you may or may not need it). I knead my dough on my bamboo cutting board, it works perfectly.
Form a well or pit in the center of your sponge add one cup of your flour & salt mix then slowly work that into the dough kneading it till covered, then repeat by creating another pit & adding the rest of the flour, keep kneading from the bottom only until flour is mixed in. Add another cup of flour only if dough is very sticky. Kneading for me is kinda like folding towels, I pull one side over, then the other & the other (4 sides) & repeat from the bottom only & this pulling action will make a smooth top.
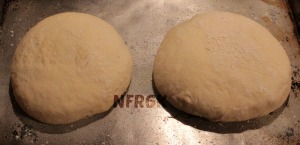
Let your dough sit there a few minutes while you wash & dry your mixing bowl, now take your oil & liberally apply to inside of bowl. I like to just add some oil to the bottom of the bowl & rub on inside of bowl with my hands. Now pick up your dough & sit in the bowl smooth side down wait about 30 seconds for it to get oil on it & turn it over, now cover bowl & let sit 2 hours.
Tip: Again you can let this stage go 2 hours, 4 hours, 8 hours, overnight, 12 hours whatever works for you. I tend to feed my starter one day, wait 24 hours, make my sponge wait up to 24 hours, knead my dough & wait up to 24 hours. You can do it sooner or let it sit until you are ready (within reason).
Options: you can add 1/2 cup of sugar & 2 tbsp of cinnamon into the flour salt mixture if you want cinnamon bread. You can use white sugar, cane sugar, refined sugar, raw sugar, sugar in the raw, I use Organic whole unbleached sugar from Tropical Traditions here.
Making your dough into loaves of bread step 3:
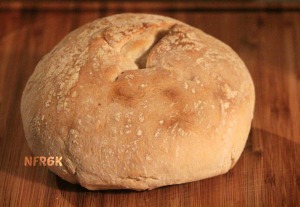
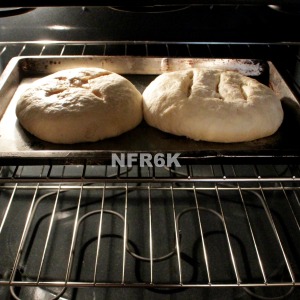
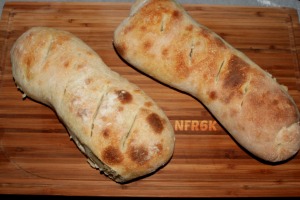
As you can see by my pictures when I make loaves of bread I do not use a bread pan, you can if you want & I do sometimes. I do prefer to just put on a pan & bake. And as you see I make either round rolls or long rolls, but you can get creative, I many times make a bunch of dinner size rolls & have even made other things like biscuits or cinnamon rolls as well.
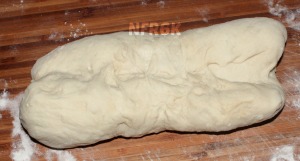
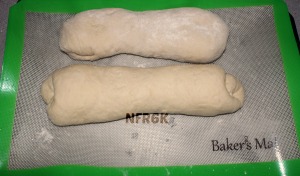 Ok start kneading your dough the same way as last time but only do it enough to have a smooth top, so less is more with kneading but you do need to knead :) then sit the dough on your greased baking sheet (as you can see by some of my pictures I have a new baking mat (review coming very soon) & it does work great for my bread & no need to grease the mat). Knead the other half of the bread & sit it on the pan, cover pan well with plastic wrap (I know I hate plastic wrap to but sometimes well it just works best).
Tip: I like to get the pan warmed to about 200 before adding the dough, let cool about 10 minutes before wrapping with plastic wrap. This is just a trick I was taught long ago that I use anytime I am baking bread, biscuits etc.
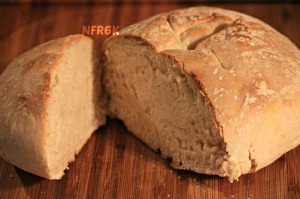
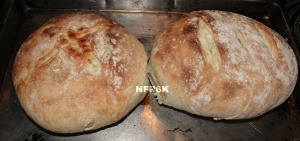
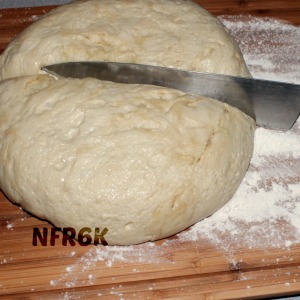
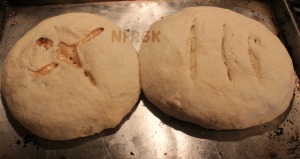 Let sit 2 to 4 hours then preheat oven to 450 & remove plastic wrap from pan & cut 3 or 4 slices gently into the top of the dough, any design is fine. Depending on your oven either leave the temp at 450 or turn to 425 or 400, sit the pan on the middle rack & cook 10 minutes & check bread, it usually takes 20 to 25 minutes but check to make sure you are not burning it, you want it browned not burned. If you added it to a bread pan it might take longer & may need to be cooked at a lower temp. When it is done cooking let cool down before eating, yes it does taste great still warm, but as we discovered it taste far better cool, but whatever way you prefer it do that :)
 Bread Machine:
When I was discussing on my Facebook page with my fans about doing this blog post on making sourdough bread some wanted me to include how to make it in a bread machine. I have done A LOT of research & the only real way to do that is if you have a bread machine that you can put the dough in it after doing the first parts of step 3 above & let it sit 2 hours (I have never used a bread machine so I hope you understand this). So you still need to do all the work in the steps you just cook it in the machine & by what I can tell by reading it is a lot harder than just baking it my way. But for those who still would like to try I basically recommend doing a lot of research for your type of machine.There you go, you made your family fresh bread & you brought the love.
_______________________________________________________
Do you have a question? Do you want to contact me? It is easy to contact me with your questions. Go here
_______________________________________________________
The information on this site it intended for general inquiry, research & informational purposes only & should not be considered a substitute or replacement for trained medical advice, diagnosis, or treatment.
I am NOT a doctor, this page is for education & research only, & is NOT intended to be medical advice. Always consult a doctor, your health practitioner or other competent licensed health professional before taking any herbs or supplements, using alternative ideas & for any specific advice about medical treatments.
If you think you, or anyone in your home or who are under your care, are ill or in need medical treatment, please seek the needed medical treatment Any of the information contained in the pages of Natural & Frugal: Raising 6 kids blog, blog posts, site, Facebook page, Twitter, Pinterest or elsewhere are for information & research only.
What Brands of coconut oil do I trust for taking & oil pulling?I am NOT a doctor, this page is for education & research only, & is NOT intended to be medical advice. Always consult a doctor, your health practitioner or other competent licensed health professional before taking any herbs or supplements, using alternative ideas & for any specific advice about medical treatments.
If you think you, or anyone in your home or who are under your care, are ill or in need medical treatment, please seek the needed medical treatment Any of the information contained in the pages of Natural & Frugal: Raising 6 kids blog, blog posts, site, Facebook page, Twitter, Pinterest or elsewhere are for information & research only.
That is simple I use & recommend these 2 great brands:
- Skinny & Co. Coconut oil: Medicinal grade Extra Virgin coconut oil 100% pure. (click link for ordering info)
- Tropical Traditions Virgin Gold Label Coconut oil. (click link for ordering info)
- Facebook Pages:
- Main page: Natural & Frugal: Raising 6 kids
- Secondary blog page: Natural & Frugal raising6kids.wordpress.com Blog
- And my daughters blog - Naturally Teen Approved -
Virgin Coconut Oil, Gold Label how to Use Coconut Oil: There are hundreds of uses!
- Tropical Traditions video on Gold Label Virgin Coconut Oil.
- Referral links: Gold Label Virgin Coconut oil, Green label Virgin coconut oil, Palm Oil, Palm shortening, Extra Virgin Olive oil, Organic Sesame oil, Coconut water Vinegar, Organic Apple cider vinegar, Balsamic vinegar Pink Himalayan salt, Organic spices.
“If you order by clicking on any of my links & order from Tropical Traditions & have never ordered from them in the past, you might receive a free book on Virgin Coconut Oil, & I will receive a discount coupon for referring you"
- My reviews policy: I am sent products to review on my blog and that all opinions are my own. (to contact me to review your product go here)
Thank you for supporting my Facebook pages, Blog & sharing with your friends, Cheree of Natural & Frugal: Raising 6 kids
_______________________________________________________
By Natural & Frugal: Raising 6 kids
No comments:
Post a Comment